JIS-CTF: VulnUpload Vulnhub Writeup

My first boot2root beginners challenge taken from here: JIS-CTF: VulnUpload from vulnhub.com.
First we start with a nmap scan:

Flag 1

The nmap scan already reveals a lot of information. The first flag can be found under the url http://[jordan vm]/flag:

The 1st flag is : {8734509128730458630012095}
Continue reading

An overcomplicated solution for cmd2 ctf at Pwnable.kr

When I got some free time I try to solve some beginners hacker ctfs. Recently I stumbled over cmd2 at Pwnable.kr and it took me some time to solve it. Later I realized that my earlier attempts would have been successful if I knew the difference between calling arguments with "..." or '...'. 🙂
For starters, when calling a binary with "$(...)" the code inside $(…) will be executed first and then the result will be the arg for the binary.
When a binary is called with '$(...)' the whole parameter will be seen as argument. With some help from youtube I used the following solution for cmd2:

./cmd2 '$(cs() { printf ${@}; }; cs "\57bin\57cat\40fl"; cs "ag";)'

An easier solution as seen here would be:

./cmd2 '$(echo "\57bin\57cat \57home\57cmd2\57f")lag'

wsoltys in the media …

… not really but my repository at github was seen in the recent retrorgb podcast:

Looks like to totally forgot to insert a readme with the link to the original sources. Shame on me. I’ll do that later but meanwhile here the link where I got all the stuff: https://svn.pacedev.net/repos/pace/
Kudos to tcdev for all the work!

Update:
I’ve updated my repo https://github.com/wsoltys/pacedev with the latest sources from Mark’s svn and a readme to his repository.

“Retr0bright” my SNES

After watching several videos about brighten up your old retro gear I tried the method on my SNES (see 8-Bit Guy cleaning an old computer). Unfortunately with mixed results.
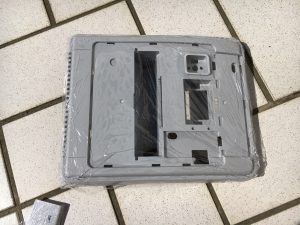
Instead of mixing the retr0bright mixture I’ve bought cream oxide with 12% hydrogen peroxide. Since its a cream it sticks fine on the SNES case. To prevent it from drying I wrapped it in transparent polythene foil and left it a few hours in direct sunlight.

Continue reading

Using a C128 power supply for your C64

My recently bought C64 breadbox came with the power supply which looks like a shim. The DIN connector only has 4 pins. Unfortunately it was broken somehow and since it is pured in resin it couldn’t be repaired easily (at least by me).
Looking for a replacement I found a lot of places which state the original C64 power supplies as unreliable and often responsible for a broken C64. Better would be a “new” switching power supply which was handmade and barely available these days.
I also read that the C128 has a switching power supply which delivers the same Voltage (9V~ and 5V-) as needed by the C64 but with a different power connector (square). So, why not use a C128 power supply for a C64?
I got my hands on a used C128 power supply from ebay. Unfortunately it was broken too. But the C128 power supply isn’t pured in resin and can be opened easily by removing four screws. After looking a little closer and doing some measurements the fix was quite easy by replacing the fuse on the primary side (the C128 power supply uses two fuses, both slow blow: one 315mA on the primary side and one 1.4A on the secondary side (AC)).
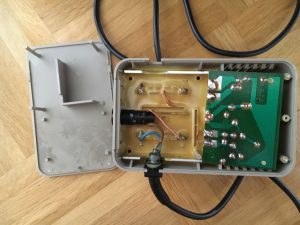
Okay, the power supply worked again but how to replace the square connector by the DIN one for the C64? I’ve got a few male DIN connectors but fiddling with it wasn’t m first option. Why not use the power cable from the original power supply? The shim was easy to open if you use a screw driver and a little force on the small end of the box. Even the plastic pins in the resin came out easily. Below a picture of the open C64 power supply with the DIN power cord already desoldered:

IMG_0315

Continue reading